David Rankin Watercolor Workshop Training
David refers to himself as a Watercolor Trainer, in that he actually trains artists in both basic, as well as advanced brushwork and procedures that make Transparent Watercolor much easier... with more enjoyable visual results.
A Broken-Edge Wash
This unique watercolor skill requires a combination of skills. And each skill can be practiced individually so that they can be enhanced, refined, and mastered.
Broken-Edge Wash - Focus on the tiger’s tail in the finished painting. Can you see how the upper edge of the tail has a very sharp clean edge? That edge is created with what I refer to as a “Cutting Stroke”, the result of which should look very clean and sharp… like it’s been cut with an Exacto knife. But the bottom edge of the tiger’s tail looks ragged & uneven. That’s because a tiger’s tail “is”… smooth and clean on top… but ragged, rough, and uneven on the bottom.
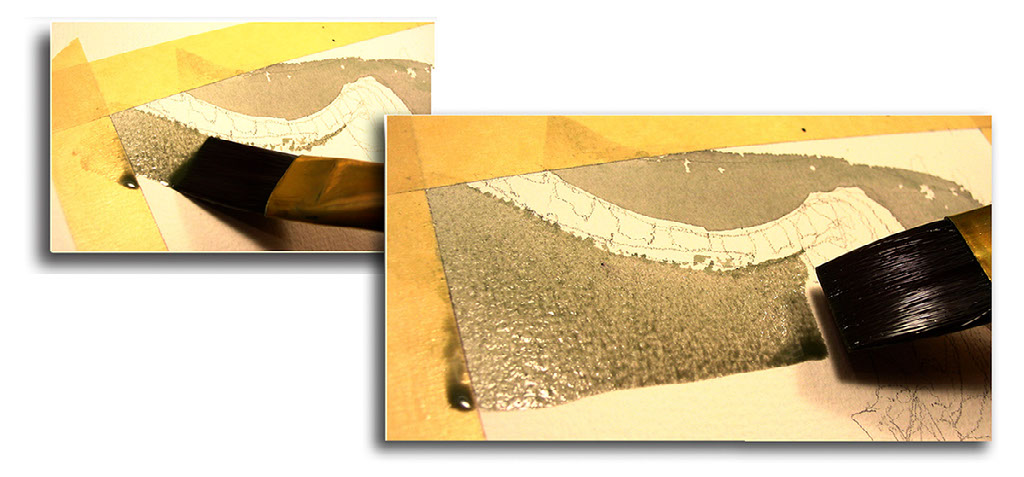
To paint that bottom edge quickly & elegantly you need two things… the ability to create a “Broken-Edge Brushstroke”… and… rough watercolor paper. These two images show the creation of the initial “Broken-edge brushstroke”… created by filling a Rigger Brush with wet pigment… laying it horizontally on the paper… and dragging it lightly over the rough paper… creating the lovely broken-edged brushstroke that you see here.
The Broken-Edge Brushstroke… created with a Rigger Brush… is relatively easy to do as long as you make sure you lay the brush over onto its side... and drag the belly of the brush lightly over the rough surface of the paper. When done correctly it looks like this... with broken edges that sparkle.
However… when you are creating this broken-edge brushstroke… to be used as the edge of a wash… you cannot dawdle or the brush stroke will dry out before you start attaching a wash to it.
Crucial… If you don’t have your brushes and paint ready to go… in the short few moments you are looking around for your wash brush… or needing to mix more wash color… that thin Broken-edge Brush Stroke will dry out. When you start trying to attach a large wash to that thin brush stroke… it will not merge with the wet wash. And it won’t look right.
Switch brushes quickly. Once you've create this broken-edged brushstroke you have to switch to a bigger brush quickly… in my case I use Steven Quiller’s 1” Wash Brush ( 7010 ).
Connecting a Broken-Edge Wash - The trick here is to create that Broken-Edge Brushstroke… then quickly switch to the larger wash brush... and connect the wash to that brush stroke as shown in these photos.
Start the wash Notice how I just touch the upper right corner of the wash brush to that still-wet Broken-Edge Brushstroke. Because that Broken-Edge Brushstroke is still wet... all you have to do is just touch it and the broken edge merges instantly into the wet wash stroke.
Drag that upper tip corner of the wet 1” wash brush... right along that initial broken-edge brushstroke. And look at how easy and beautiful this effect is! Look at this lovely wash that is now extending right out from that broken edge... Fabulous!
Techniques like this… where you are combining 2 or more specific brushstrokes and their respective visual effects together quickly… must be executed correctly in order to create the proper overall visual effect.
When you do this correctly… you will see this wonderful visual effect… where the original broken brushstroke merges perfectly into the wash... creating this elegant wash... with this lovely broken edge.
A few more points…
What I am showing you here is how to create a Broken-Edged Wash. But in addition… this wash is also an Even Wash. That's because it has an even tonal value from top to bottom and left to right. There are in fact several ways to create an Even Wash. This particular one… is what we also call a “Beaded Wash”.
The Bead. You can still see the last remnants of the wet pool of paint gathered there at the bottom of the tiger’s leg. That’s what is known as the Bead.
So Many Names?… I know… I use so many names for such a seemingly tiny area of the painting. The reason is that I use precise names to describe the overall uniqueness and visual effect of each particular Wash. I call this a Broken-Edge Wash because of how the one edge of the wash has this lovely broken edge quality that is so easy to create on rough paper.
But it is also an Even Wash… As we see in it’s finished quality… the wash is even in tone all over. No streaks… blotches… or imperfections… just one lovely even tone.
And… I also refer to it as a Gravity Wash I use this name to help us define a key factor in how it is created. In Transparent Watercolor… we need to use and understand how Gravity effects the paint. With the upper edge of our Watercolor Block raised about 1-2”... this slight elevation increases the Gravitational Pull on the liquid paint… forcing it to gather into a pool along the bottom edges of the brushwork. Hence this is also known as a Beaded Wash!
Broken Edge Wash Training - This painting below is a small test recipe I use to train painters... where we attach a Graded Wash to a Broken Edge... rather than an Even wash.
Watercolor Wash Skills
These images above show examples of this same Even Wash that I used under the tiger's tail. The Gray Study above is an actual Training Recipe I use in Workshops to practice the brushwork skills used in making an Even Wash. The painting is from my last expedition into the Ganges Himalayas of North India. That is an Even Wash up there in the sky. But while we're at it... notice those large cast shadows falling over the mountains on the right. Those are a totally different kind of wash effect... done in a totally different way... and having Soft Edges rather than sharp ones.
A Broken-Edged Wash - A Watercolor Wash with a broken outer edge at either the beginning or end... or both.
An Even Wash - A wash with the same even value... no blotches... no streaks.
A Beaded Wash - Washes that use Gravity so that the liquid paint gathers into a slightly pool along the lower edges of the brushstrokes.
A Gravity Wash - Watercolor Washes created using Gravity in the process.
_______________________________________________________________
As Watercolor Painters... it is up to each one of us to gradually expand, refine, and perfect our imaging skills... our ability to create the vast number of elegant visual effects that Transparent Watercolor makes possible.
My point here is that in Transparent Watercolor… this single small area under the tiger's tail required 4-5 distinct brush-handling skills. If you do not know how & when to use these various skills... your paintings will not turn out the way you had hoped.
If however you do upgrade these skills… every painting idea you come up with will emerge onto paper right in front of your eyes.... far better... and faster.
Transparent Watercolor is pure Magic...!
Come and train with David at one of these upcoming Workshops...
The World looks better... in Watercolor © David Rankin 2017
Credits:
David Rankin © 2017